
The Shirt Skirt July 28, 2010 – Posted in: Repurpose, Sewing, Tutorials
I’m so excited to post about this!
When I met Dana, I fell in love with the skirt she was wearing. She made it herself (obviously) and she showed us how simply she’d shirred the waistband. The next day, during the mystery workshop at Whipstitch, we were encouraged to use thrifted tees. I’m devastatingly terrified of knits so I steered clear and made my (award winning) cotton fabric dress. But I was inspired.

I developed an idea in my head I thought just might be crazy enough to work. The next chance I had to steal away alone, I made a beeline for Goodwill. I found exactly what I was looking for, got my purchase for half-price, and excitedly headed home.
The Hubs thought I was a little crazy when I explained my idea to him. I measured, cut, and finally, with trepidation, I started sewing. Less than 30 minutes later I was wearing my Shirt Skirt!! That’s right–I made a skirt for myself from a man’s tshirt!! A shirt skirt!
It’s the easiest thing in the world to do! And I just can’t stop making them.

The shirt skirt perfect for summertime. They’re perfect for when you’re pregnant, they’re perfect for after you have the baby. They’re perfect if you change size or shape or hate your clothes. They’re just simply PERFECT. Comfortable, casual, and cheap.

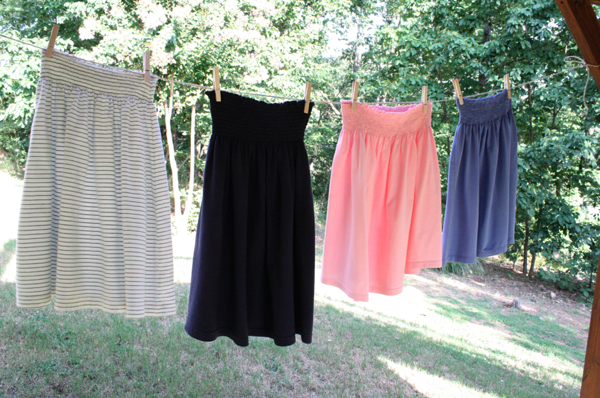
I wore the green and white one to Sofie’s birthday party. And the navy blue one to a casual family wedding. I made 2 others for a cousin.

I had 2 women in Walmart stop me to tell me how comfy my skirt looked and when I told them how I made it, they demanded I call Rachael Ray immediately!


The process is so easy. I can whip one of these up in less than 30 minutes. Wanna make some of your own? GREAT! Here’s how I do it.
I do my shopping at Goodwill for 1 reason. Their tshirts are $2.09. But they tag everything with a colored tag and every week a different color is half price. So I usually seek out shirts that are the weekly color to score them for $1.05! So those skirts on my clothesline? Cost me $4.20 total to buy. Even if I find a shirt I have to have, it’s $2. You can’t go wrong for $2!!
So, get your super cheap thrifted shirt. The bigger you buy it, the better. The green and light blue shirts were large size Large’s. The Navy blue was a Tall XL, and the pink shirt was a 3XL! It’s hard to find them with stripes, so I’m always drawn to those first. If you really want a pattern, check out the polos. They’re more expensive, but if you get them half price, they’re still in the $2-$3 range. As with anything you get second hand, check it out to make sure it’s not faded, full of holes, or stained. I like to wash mine before I begin sewing.

To determine what shirt size you should get, just make sure it will go around you. Most of the shirts I use are at least 24″ across (so 48″ total diameter). You lose 2-3 inches after you shirr it, so take that into consideration. Like I said, the bigger the better!
So, lay your shirt out flat, and whack it off right under the sleeves. (see my red tag on the left sleeve?) This doesn’t need to be perfect. That’s the beauty of this skirt. No measuring, no perfection. Wing it–you won’t be disappointed! But don’t throw away the top half of the shirt yet. I’ve got other projects for those parts!

I like to use thread the same color as my fabric. You don’t notice sewing boo-boos so much if the thread blends in. But if you’re gutsy enough, use a contrasting thread! You’ll also need an elastic bobbin so your skirt will shirr.
**If you don’t know how to shirr, check out some online tutorials or videos. It’s VERY easy! I was highly intimidated by it at first, but I urge you not to be! A great place to start is Sandi Henderson’s tutorial.

You want to start close to the edge so you don’t have a huge ruffly waist band. There’s no need to hem the top band, your knit shirt won’t fray. I like my first row of stitching to be 1/8th of an inch from the top of the skirt. So I line my fabric up with the edge of my presser foot and put my needle in the right position.

Now, I break a rule of shirring. Instructions will tell you to leave your threads and tie them. Well, I threw that rule out the window 6 skirts and 2 dresses ago! When I start sewing, I back stitch a few stitches, then sew all the way around the skirt. When I get back to my starting point, I back stitch twice (so back 3-4 stitches, forward 3, back 3, forward 3) then leave my elastic ends about 1/4″ long.
This is inside the navy skirt:

And what it looks like on the outside. It doesn’t stick out or look funny at all when you wear it. It’s not even noticeable until it’s pointed out. I’ve washed the navy and green skirts about 10 times each and the elastic hasn’t budged. So break tradition and save yourself some time!

There’s no need to mark your rows. Just use the edge of your presser foot as your guide as you sew. I like to put my needle in the left position, but my machine doesn’t like that lately. Sewing at 1/4″ rows with the needle in the middle turns out just fine so that’s what I do 95% of the time.

Unlike 100% cotton that doesn’t shrink much as you sew, knit shrinks up LOTS. So you need to make sure you pull the shirt flat as you sew. Use medium pressure when you pull. You don’t want to work against your machine, so don’t pull hard. Do it in small sections to maintain control over where you’re sewing.
**If your shirt isn’t shrinking up as your shirr, you’ll need to adjust your thread tension. Experiment on scrap pieces from your shirt until you get it to shirr properly.

When you get back to the start, hold the fabric open and flat while you do your back stitching.

Just keep sewing as many rows as you want! I do somewhere in the neighborhood of 12-15, depends on my mood and the length of the skirt. I generally need to use 2-3 elastic bobbins, so you might want to wind several before you start sewing to save yourself the hassle. Check your bobbin between rows to make sure you have enough to get back around. It’s okay if you don’t, just back stitch a few times with the new one and keep going. It just doesn’t look as tidy that way.

And that’s it! The best summer skirt you’ll ever own!

I’ve had a lot of readers submit great questions over the last few months. I wanted to go ahead and address some of them in the post just in case they get missed in the comments.
Q: I’m a beginning sewer and this looks like a great easy project. I was wondering how much the waist area decreased after shirring and steaming. For instance if you had a 48″ total circumference on your tshirt, how much would the waist shrink.
A: My skirts shrank about 2″ after shirring. That’s 2 inches when you stretch the skirt to it’s full capacity. So previous to sewing, it was 24 inches across when laying flat. After shirring and steaming, it was 22 inches. This is generally the XL size.
Q: Could this be done with like a polo shirt? and if not, does anyone have any tips on how to turn a polo shirt into a skirt?
A: Yes of course! Any knit shirt would work! Polos might be a little tricky because they usually have a split seam at the bottom on each side. So as long as it’s long enough, a polo is a great option, especially because they’re usually the fun colors and prints you can find.
Q: How do you find t-shirts that are long enough. Once I cut off the bottom under the arms, it seems SO short. Do you use extra long t-shirts for these?
A: Typically, no. If I can find them, it’s always an added bonus. My navy skirt was a long shirt and it’s definitely longer than the other shirts. But generally, the bigger the shirt, the longer it is. So when I use one that’s a 2XL, it’s going to be several inches longer than a big L. To know for sure if I’ll feel comfortable, I hold it up to me with it folded down at the armpits, and measure the length. If it’s too short, I keep looking.
Q: I have NEVER heard of a elastic bobbin before, is it sold separately or is it separate stretchy thread that you somehow fill onto a bobbin?
A: You buy elastic thread and wind it onto your bobbin by hand. It’s sold in 2 colors, white and black, and can be found (generally) anywhere that sells thread. Check out the tutorial on shirring I referenced for more information.
Q: Is the elastic thread only used in the bobbin ? Then regular thread used for the top? Also do you stretch the fabric as you go?
A: Yes, the elastic is only in the bobbin. You use regular thread on the top. I don’t use special needles either, just the regular ones I use for sewing on cotton. I don’t stretch the fabric, I just keep it flat. As you sew, it’ll shrink up on itself. You want it to stretch, so you need to pull it out to its original size, but not pull it more than that.
Q: So what are the other projects you mentioned to use the sleeves you don’t use to make the skirt???
A: I use the neck part to make the Shirt Bibs, and I use the sleeves to make shorts or bloomers. I haven’t posted a tutorial on this, but I did do it in one of my projects during SYTYC.
Q: Could you use shirring elastic in a smocking pleater?? Anyone with a pleater tried this?
A: I’ve never used a smocking pleater before. You might want to try contacting the manufacturer and asking if it can be done. I’d hate for you to try it and booger something up. Pleaters aren’t cheap!
220 Comments
Melanie July 29, 2010 - 03:04
SEW cute! I just posted my T-shirt skirt today too, check it out. I’ve never used that elastic before, but I might try it now. Thanks for a great tutorial!
lisa July 29, 2010 - 08:30
I’ve been scared to try elastic, but this looks easy! And if I mess it up it’s only a t-shirt! I might try it . . . when I actually can grab some time to sew!
Tammy@InStitches July 29, 2010 - 08:37
Oh my, this is so cute ! My niece and I will be making a ton of these this summer. thanks for the tute. I just need to figure out if my bobbin will work with elastic……
Leesa July 29, 2010 - 09:37
This is such a cute idea. This would be a great project for a 4H sewing group. I can see them taking all of their dads sirts and making skirts out of them.
Erin July 29, 2010 - 09:38
I am on a mission to Goodwill, I am not the best at sewing but I dabble in it and I want to try this!!! Adorable and easy (hopefully)!
Betsie July 29, 2010 - 09:51
I finally get to see the shirt skirts I’ve been hearing so much about – and they’re awesome! 😀
Tori Knight July 29, 2010 - 10:57
I am “sew” blown away with your awesomeness! It makes me want to go buy a sewing maching and get to it! I have never done it before but this makes me want to so badly… and makes me want to have a girl!
Sassy Sites July 29, 2010 - 11:05
Those turned out cute!!! Great job! Your blog is so cute with lots of fun ideas here! I’m a follower …coming from Sassy Sites. 🙂
Tammy July 29, 2010 - 12:02
Hey! Those look comfy and cute! I’ve been on a shirring kick lately, so I just may have to try one of these for myself!
Robin July 29, 2010 - 17:03
Thank you so much for linking this genious project up to my blog. I am a lover of all things goodwill because our goodwill has a different $1.00 tag every week. I once got a wedding dress for a dollar!
I am going to have to try this one!
Anne K. July 29, 2010 - 20:09
What a fun idea – elegantly simple, boho chic! Thanks for sharing!!
amy hooper July 29, 2010 - 21:51
awesome!! i love this idea! it’s so hot here in ATX i need some new skirts to keep me cool, and i think these are the ticket!!
Lauren July 30, 2010 - 14:20
Saw these kercheifs and thought of you!
http://www.zulily.com/babynay072910.html
I know they’d be so cute on Sophie and Kenzie 🙂
Heather July 31, 2010 - 22:13
Ohh I adore these skirts. I am going to have to make some! My husband just gave me a pile of shirts he no longer wears that would be perfect for this project. I will let you know when I post them thanks for sharing!
PS That is how I shirr as well – back stitching is so much easier!
Rachel August 02, 2010 - 18:35
Oh wow! Those are so, so cute! Betsie emailed me about these and she was right- I love them! I’m so glad she let me know about your awesome blog. I would love to link to this post if you didn’t mind.
Melissa August 02, 2010 - 18:50 – In reply to: Rachel
Of course I don’t mind! I would be honored!! Betsie is a wonderful friend! 🙂
Melissa August 02, 2010 - 18:51
Thank you everyone! I hope you’re all trying it out. Maybe I should start a Flickr group so I can see the skirts you all create!
stephanie August 03, 2010 - 22:46
Love, love, lovety love!
Scotti O. August 03, 2010 - 23:38
I love, love, LOVE this and being pregnant this summer it’s the perfect project for me! I can’t wait to run to Goodwill tomorrow though mine doesn’t have the color dot sales. I am linking to this post from my blog tomorrow; I hope you don’t mind! If you do please let me know and I’ll take it down. If not, you can see it tomorrow here: http://oxfordfam.blogspot.com/
Messymama/beth August 04, 2010 - 09:51
This sounds so fun and easy! I can’t say that it *looks* fun or easy though because sadly all but one picture is that Photobucket Bandwidth Exceeded sign instead of the actual pic :/ Just wanted to let you know. But, even without the pictures, I think you just gave me my project for the day!! 🙂
Tairay August 04, 2010 - 11:36
How cute! I’ve seen so many shirring projects that I’m tempted to finally buckle down and try it! This skirt totally looks like what I plan to spend the rest of my life wearing. I found your site through One Pretty Thing and am hooked! Thanks for sharing! (and shirring ^_~ )
Adventures in Dressmaking August 04, 2010 - 13:43
How simple and fun!! What a great and easy idea. I love it on the striped ones…
Jacinta August 04, 2010 - 18:47
Wow how easy is that?!! I bought a skirt like that years ago and it is so comfy… now I can make my own! thanks.
http://www.modelmumma.blogspot.com
amanda August 04, 2010 - 19:28
So totally awesome!! I have made about a billion skirts this summer (and I wear them all) – my husband just laughs at me – like you really need another skirt? But yes, yes I do – and this one looks just so perfect! Thank you!
Sylvia August 06, 2010 - 02:29
Just made one and LOVE it. So easy and comfy. Thanks for the tutorial. 🙂
Amanda Shuler August 10, 2010 - 13:27
I LOVE, LOVE, LOVE, this idea! I can not wait to try it!
Katie August 12, 2010 - 09:11
How cute! I might be trying this very soon! I love, love, love knit skirts but cutting/sewing knit from a bolt is SUCH a pain! I’m not the straightest cutter anyway and then when its curling up on you its a nightmare! T-shirts take most of that out of the equation! I love it!
Also, Heather Ross (fabric goddess) did a tutorial on Martha Stewart on shirring. She did this really cool thing at the end where she stretched the shirred fabric and sprayed it with water then ironed it and it made the elastic shrink up nice and tight so if the shirring is still a little loose, maybe you could try that! I mean, it will stretch back out when you put it on, so that might ensure a nice snug fit. Great tutorial, thanks!
Would you mind if I shared it on my blog?
Melissa August 12, 2010 - 09:40 – In reply to: Katie
No Katie, I don’t mind at all if you share!
And typically, yes, you spray and iron shirring. But with this project, there’s no need to do so. The knit shrinks up so much there’s not much difference when you wet and iron it. You’ll notice a little difference after washing, but you can wear this straight off the sewing machine! 🙂 I hope you try it, you’ll love it!
debbie slaughter August 12, 2010 - 16:02
Ive been sewing for 29 years and still love it . your shirt skirt is one of the greatest i have seen love it love love it
Craft Blog » Turn A Tshirt Into A Skirt August 28, 2010 - 23:02
[…] See the full tutorial here. […]
Turn A Tshirt Into A Skirt | World of Mom's August 29, 2010 - 17:30
[…] See the full tutorial here. […]
Shirt Bibs | Sew Like My Mom September 20, 2010 - 14:56
[…] when I made the Shirt Skirts I said keep the rest of the shirt for 2 other projects? Well, this is one of […]
Katherine September 23, 2010 - 21:01
LOVE this!! I’m gonna share it with everyone I know!! THanks soo much for this idea!
Irene September 26, 2010 - 02:33
Hello!
I work with Kristin on the Sew,Mama,Sew! blog (http://www.sewmamasew.com/blog2). We are preparing for our next theme on the blog which will focus on babies & their mamas and we’d like to use your photo from this great tutorial!
We’ll link to your site and give you all of the credit, of course! Would this be OK? We respect the copyright of all crafters so all links and photos from blogs for our themed posts are used with permission. Please let me know via email, and also feel free to include any relevant information you’d like me to post with the tutorial link.
We look forward to hearing from you,
~ Irene
Logank1015 October 07, 2010 - 18:43
I’m a beginning sewer and this looks like a great easy project. I was wondering how much the waist area decreased after shirring and steaming. For instance if you had a 48″ total circumference on your tshirt, how much would the waist shrink. Thanks a lot!
Melissa October 07, 2010 - 19:09 – In reply to: Logank1015
Hi Logan! My skirts shrank about 2″ after shirring. That’s 2 inches when you stretch the skirt to it’s full capacity. So previous to sewing, it was 24 inches across when laying flat. After shirring and steaming, it was 22 inches. Hope that helps! Please don’t hesitate to email me with any questions you may have!
Melissa
Steph October 18, 2010 - 08:51
Great tutorial! I purchased some of the elastic some time ago, but haven’t used it yet. This looks like a great first project. And I do love shopping at Goodwill!
October 19 ~ Mama & Baby Essentials Tutorial Round-Up + Hasenpfeffer Incorporated Giveaway « Sew,Mama,Sew! Blog October 19, 2010 - 09:32
[…] Gold Dots Dress 2. Dress 3. Most Flattering Shirt Dress 4. Sunshine Daisies Bottom Mellow Dress 5. Shirt Skirt 6. Bubble […]
Hannah December 03, 2010 - 16:40
LOVE these! I am definitely making some for myself and for my sisters this spring!! Thank you so much! I am always looking for a new skirt pattern =)
Lukas December 17, 2010 - 13:50
Could this be done with like a polo shirt? and if not, does anyone have any tips on how to turn a polo shirt into a skirt? any help would be very appreciated. I’m trying to win this scholarship to SCAD!!
OMG SEWING » Sewing To Do! January 09, 2011 - 23:17
[…] Shirt Skirt […]
Jen February 03, 2011 - 18:39
Just came across this tutorial! I love it so much I went the fabric store to pick a few things I needed to give this a try! Granted, it’s only 12 degree’s outside but hey, why not get a head start on some summer clothes!
Em February 11, 2011 - 00:23
that’s really cool! and i’m surprised shirring is so easy. i took a shirred top to a tailor for repair and she completely botched it.
Kelly Land February 12, 2011 - 00:07
These are SO awesome looking! I am excited about this idea but have one question, how do you find t-shirts that are long enough. Once I cut off the bottom under the arms, it seems SO short. Do you use extra long t-shirts for these? Thanks so much. OH YA, also, I have NEVER heard of a elastic bobbin before, is it sold seperatley or is it seperate stretchy thread that you somehow fill onto a bobbin?? Thanks for all you info and this great idea!!
God bless!
Kelly
Natissa February 23, 2011 - 00:51
I love the recycling! I started making this type of skirt four
years ago when I was losing weight…it fit me for about 4 different sizes and preggo, after preggo. I made mine from premium quilting fabric and its LASTED!
A couple tips to share, measure your middle where you would like the skirt to sit and add 4″. This should be the right amount of ease to have before shirring.
Try picking up and moving the skirt at the end of each round instead of tying (it comes undone!).
Mens shirts are usually a lot longer than womens. Sadly there is always a lot less mens clothes than womens in thrift stores.
patti February 28, 2011 - 12:00
Just found your blog and was browsing around when I came upon these….what a great skirt! I’m excited to get started making some of these for summer.
Ashley C. March 07, 2011 - 21:43
I absolutely love this! I’m new to sewing, and I’ve been wanting to try making skirts for a camp this summer. My pastor’s wife makes great jean skirts for summer out of jeans that are a little shorter than a regular long denim skirt, but I’ve been looking for something for the night services. I think this would be perfect. I like my skirts to be longer, so {this may be a silly question, but again I’m new to this whole thing. :D} do you think this would work with like a knit dress cut off? Either way, I really want to try this out!
-Many Smiles!
Amber @ Classic Housewife March 08, 2011 - 01:24
I think I may give this a try for my girls this summer.. whip up a few goodwill shirt skirts for each of them. (It’ll save a bundle on that summer wardrobe!) =)
Susan March 08, 2011 - 09:01
This is so cute! I can’t wait to visit my local Goodwill to hunt for t-shirts and try to make my own skirts!!
saffiertje March 11, 2011 - 07:39
I love the skirts! So easy at summertime! And what a great price you have to pay for them!~I will look for great ones here in the netherlands. Just turnesd old pj’s into a skirt for my DD by this tutorial, also a great fit for us mommy’s…
http://www.makeit-loveit.com/2011/02/repurposing-shirt-into-skirt-with-yoga.html
But deffenetly gonna try this one too
Faa March 21, 2011 - 23:29
Why would the people at Walmart tell you to contact Rachel Ray?
GlendaLynn April 03, 2011 - 14:33
Great skirt idea – But…if you don’t want to do the shirring for a waistband try this idea from Themotherhuddle.com. Just find a shirt that fits you tight for the waistband and another for the skirt. I haven’t tried it yet but am looking forward to combining these two great ideas. http://www.themotherhuddle.com/easy-elastic-waistband-for-a-little-girls-skirt/ Thanks
Chelsea April 04, 2011 - 09:53
I just purchased my first sewing machine and am excited to try this skirt as my first project! I have a question – where along the skirt should the row of elastic ends be? Should this line of up with the side seam on the t-shirt? When you wear the skirt, are the elastic ends at your side, in the front, or in the back? Thanks!
Rebecca April 08, 2011 - 20:41
Thankyou so much for this tutorial! This is exactly the kind of skirt I want this summer and this is so much better then buying skirts! I made my first one and love it so can’t wait to make more!
It’s on my blog here: http://rebeccawilliamson91.blogspot.com/2011/04/shirt-skirt.html and I linked back to you! Thankyou again 🙂
Jen April 17, 2011 - 21:12
I just made your skirt, and it came out awesome!! I had to cut it above the arm pit (I just cut up along the sleeves and hemmed them together so I could add 2 extra inches. It turned out okay because it is hidden in the shirring). I have 2 more shirts to transform into skirts, and I look forward to being comfortable all summer.
jj April 19, 2011 - 18:09
I love this tutorial! I’ve seen at fabric stores yo can buy fabric with the elastic already in the top and all you would have to do is put in a side seam, it would be easier, but half the fun is making the “shirt skirt”
Astrid April 22, 2011 - 19:13
I love the idea! It can easily be adapted to fit even my type of clothing… the whole idea of a skirt that rests on your hips, is slightly outdated for me, but perhaps it will grow on me… nevertheless I can’t help but love these skirts, and they look… so comfy! Thank you!
Sara April 24, 2011 - 03:31
I love this! very cute 🙂
check out my work http://roadyjane.blogspot.com/2011/04/cut-chenille-blanket.html
Deanna April 27, 2011 - 21:46
What a great idea – love the ideas of making these with used t-shirts from goodwill!
striped shirt skirt | SHE'S CRAFTY May 02, 2011 - 10:09
[…] I saw this tutorial for a shirt skirt, i fell madly in love. I wish a had elastic thread like she did, but i […]
Elisa May 11, 2011 - 01:56
genius! I made this today although I have never sewn with a machine before and it turned out beautifully! I will make many more of these. What a lovely perfect amazing idea! i will never buy a skirt again.
The Shirt Skirt | parentpalace.com May 11, 2011 - 13:31
[…] And that’s it! The best summer skirt you’ll ever own! https://sewlikemymom.com/the-shirt-skirt/ […]
Jackie May 12, 2011 - 11:20
I just posted about my try with your tutorial on my blog! I LOVE my “new” skirts!!
http://monkeymommascrafts.blogspot.com/2011/05/diy-t-shirt-skirt.html
Thank you so much for the tutorial!!
Links to Free Sewing Patterns! May 25, 2011 - 23:34
[…] 5 minute skirt Ruffle Skirt Shirt into Skirt with Yoga Style Waistband The Shirt Skirt Women's Skirt with Yoga Style Waistband How to Make a Skirt out of Scraps Three […]
Anna May 26, 2011 - 01:15
I love this. I am a new sewer and this sounded like the perfect project.
I am having some trouble though. I am working with a Singer Promise sewing machine. The bobbin case loads from the front. I got three rows in and realized it wasn’t looking the same. I tried to stretch it to test the elastic and all I heard was “rip rip pop rip rip pop” and all my stitching broke. I looked at the back and realized that the elastic was only being stretched across the back.
I think that this is because the bobbin case that I use (one where it clips out of the front of the machine) has a tension flap on the top that you slide the thread under. I have a feeling that this is making the elastic too tight, thus making it impossible to shirr.
If anyone has any suggestions I would greatly appreciate it! I’m new and I don’t want this frustration to keep me from enjoying sewing. I’ve started and am not giving up. I just need some help from you professionals.
Thanks so much.
A
Wendi June 01, 2011 - 22:36
I had so much fun making these skirts for my daughter. They are perfect for a summer skirt. I bought a hot pink and orange striped woman’s shirt to try a small skirt for my little granddaughter. Thank you so much, and I look forward to seeing what you have in mind for the rest of the shirt!
Lynda June 08, 2011 - 02:13
These skirts are lovely and just the ticket for our hot weather out here in Australia. Thank you for posting such easy instructions because I’m not the most confident sewer. I’m gonna give this a try for sure. Thanks again for sharing. And added bonus… the hubby can’t complain about the price… just about the shirts missing from his wardrobe ha ha ha 🙂
Recycle a t-shirt into a skirt :: Money Saving Mom® June 14, 2011 - 11:32
[…] Sew Like My Mom shows you how to take a thrift store t-shirt and turn it into a skirt. […]
Char June 14, 2011 - 13:05
Is the elastic thread only used in the bobbin ? Then regular thread used for the top? Also do you stretch the fabric as you go?
katiekate@texasnorth June 14, 2011 - 13:39
I love making these! I cheat even more by simply starting at the top, making a complete circle, and then continuing down the shirt/skirt in a spiral… no stopping after each row. It’s impossible to tell from the outside AND there are no threads on the inside (for us super-sensitive folks).
I would just like to say that my code word at the bottom here is HOLLA, which is awesome.
Amy June 14, 2011 - 13:48
So what are the other projects you mentioned to use the sleeves you don’t use to make the skirt???
ashley June 14, 2011 - 14:08
i am so trying this! elastic bobbin has always scared me, but this sounds so easy!! i’m 7 weeks pregnant and these will be so comfy and cool for summer! i’m also thinking about making one into a dress… shirred area would be worn about the bust and i’m thinking i’ll tier extra shirts onto the bottom(as long as i can find some XXLs at goodwill!) i know you’re not featuring anything like that, but would you have any pointers/tips? any problems with that plan that i’m not thinking about??
Onto The Next Big Thing « Making A House Our Home June 14, 2011 - 16:37
[…] Here is the how-to post: https://sewlikemymom.com/the-shirt-skirt/ […]
Jennifer June 14, 2011 - 17:24
Could you use shirring elastic in a smocking pleater?? Anyone with a pleater tried this?
Helen G. June 14, 2011 - 17:58
Oh my goodness!! I NEED to try to make these ASAP!! It’s getting so hot here and being 35 weeks pregnant, I LONG to wear comfy skirt! Must go to Goodwill soon!! Thank you for the great idea!!
Shirt Skirt Sewing Project – My Discount Buddie June 14, 2011 - 18:06
[…] a full run-down on how to sew the “Shirt Skirt” click here. If anyone decides to make this PLEASE send in photos! I’d love to see them! Posted in […]
Melissa June 14, 2011 - 18:12
Thanks for all the great questions today, ladies! I’ll answer them here, then add them to the post as well.
Char–Yes, the elastic is only in the bobbin. You use regular thread on the top. I don’t use special needles either, just the regular ones I use for sewing on cotton. I don’t stretch the fabric, I just keep it flat. As you sew, it’ll shrink up on itself. You want it to stretch, so you need to pull it out to its original size, but not pull it more than that.
Amy, my other projects are the Shirt Bibs made from the neck part (tutorial is listed down the side of my blog), and shorts or bloomers made from the sleeves. There’s one posted from the SYTYC competition but I’ve not done a tutorial on it yet. I’ll edit and link to them both in my post.
Ashley, I’ve never done anything other than a skirt, but I’ve been thinking a lot about wearing them as shirts! I’m nearly 26 weeks pregnant and it’s HOT here in the South. I don’t have ideas or advice for you, but I’m definitely interested in the project and would love to see it when you’re finished!
Jennifer, I’ve never used a smocking pleater before. You might want to try contacting the manufacturer and asking if it can be done. I’d hate for you to try it and booger something up. Pleaters aren’t cheap!
Shari June 14, 2011 - 20:53
Cant wait to try this, have also decided to repair an old favorite dress that the shirring has given out on thanks to you awesome information!!
The Shirt Skirt - Sharing the savings, one deal at a time! - Good Deal Alert June 14, 2011 - 22:18
[…] came across this very cute, easy and inexpensive “Shirt Skirt” sewing project idea online recently that I wanted to share with you that has piqued my interest to dust off my sewing […]
Anna June 14, 2011 - 23:02
Thanks for posting this! I am about 4.5 months pregnant and this EXACTLY what I want to wear all summer long!! I just made my first one tonight, but I will definitely be making more.
My husband suggested cutting the shirt higher and using the sleeves as pockets. I’m still working out the kinks on that one (ran out of thread!), but I think it has potential!
Thanks again!
Cutest Ever Skirt Idea « Joy-filled Days Blog June 14, 2011 - 23:12
[…] shirred with elastic thread. Pop over here to see the tutorial at Sew Like My Mom’s website! here photo credit: Sew Like My […]
DIY Project – The Shirt Skirt June 15, 2011 - 12:31
[…] Sew Like My Mom has a fabulous tutorial on how to transform a man’s t-shirt into a super comfortable skirt! […]
Moe June 15, 2011 - 14:03
OMG! I’ve always wondered how to do shirring (I didn’t know that was what it was called) and this looks like a great (and inexpensive) first project to try it. I have to stop at the fabric store this week just to check out the elastic thread. Super cool project and actually a good way to use up those old armpit stained shirts instead of throwing them out or using them for rags.
Chili Pepper June 15, 2011 - 15:08
Love this idea. Can’t wait to try it out. My girls and I all sew and love to experiment ourselves. My husband always gets a little skeptical, too, when we pitch a new idea…. that he could really not care any less about anyway. ☺ I am getting ready to give birth to our 9th and am starting to put away things to wear after baby arrives. I think this will be just the thing for after giving birth in the dead heat of summer in Maryland.
Thanks,
Kat
Rose Marie Schaer-Wade June 15, 2011 - 15:49
Just bought an inexpensive sewing machine cause I wanted to branch out a bit
with crafting skills & learn how to sew & stumbled across your blog & what looks like a super-simple & inexpensive beginner project. I CAN’T WAIT TO GET TO OUR LOCAL THRIFT STORE! Thanks. Am now a subscriber.
Kristen @ Dem Golden Apples June 15, 2011 - 22:28
Wow, this is so cool! I just found your site, and I am really excited! There are so many posts I want to read. Thanks for taking the time to share this great info. I am going to make some of these this week, I hope!
Sandra June 17, 2011 - 15:24
I’m 5’5″ and like my skirts well below my knees, so I was initially bummed that I couldn’t make some for me (though I will make them for my girls). I was at a thrift store today and had an inspiration. They sell the long chemises/nightgowns made out of t-shirt material. They are so much longer, so I can make some for me, too!! I’m getting ready to try my first ones a little later.
Julia June 19, 2011 - 09:46
I prefer long skirts but I am on the skinny side. You can get a larger size and then just sew new side seams for a perfect fit. And it only takes a few minutes.
Kimberly June 19, 2011 - 10:04
I can’t wait to try this.
karie June 19, 2011 - 22:24
I’ve made a few of these for myself and my daughter, and I’ve gotten my non-sewing neice making them, too! Thank you so much for the directions, I LOVE the skirt and would wear it everyday if I could (unfortunately I can’t wear it while I’m at my son’s Therapeutic Riding Center—-skirt + horse = disaster!)
Chavonne June 20, 2011 - 00:10
I am so going to do this!!!!!! Thanks!!!!!
Andrea June 20, 2011 - 13:03
These are so awesome. I need to get a sewing machine now…
Hobby Lobby: 50% off Youth & Adult Shirts ($1.49-$1.99) and a “Shirt Skirt” Sewing Idea! June 20, 2011 - 14:46
[…] me some great ideas for re-using shirts – or, even using these to make your own skirt- head over HERE to “Sew Like My Mom” where you can learn how to make a Skirt out of a Shirt. I love this […]
Sew Woodsy June 21, 2011 - 09:22
LOVE these shirt skirts! I think I can probably get my husband to give up an old shirt so I can try this project out! I’ve never done the “shirring” before… so I’m a bit intimidated but ready to tackle it. Thank you for providing a link to a tutorial on how to do it. Every blog post I visit never shows or points you to the place to learn how to do the shirring! 😉 Thank you!
Diana June 21, 2011 - 21:48
@Anne, above: I had the same problem, and I had to put my tension up several notches. I usually put it on 3, and I moved it to about 6.5. It definitely helped the top thread grab and hold the elastic thread.
Also, here’s my problem: I thought I bought Elastic Thread–but it was not on a spool, and it was called “beading cord elastic.” It’s really thick–almost too thick to go through my bobbin–and when I sewed around my shirt, it took it in way more than 2 inches! It was a 3XL shirt, and I can hardly get it over my hips (and I wear about size 4 usually). Does true elastic thread shrink up less? Anyone know?
Love this skirt, though!
Diana June 21, 2011 - 21:50
Oops, I meant @Anna. Sorry!! 🙂
WHS73 June 21, 2011 - 21:51
In answer to using the elastic in a smocking pleater, I don’t think it will work. First, I don’t think the elastic would fit through the eyes of the special needles used by the pleater. Second, a smocking pleater runs the thread through the fabric at regular intervals to gather the fabric in preparation for smocking. Because the elastic will have a tail where it goes through the needle it would make a lot of bulk to thread through the fabric. And lastly, threading all the needles of the pleater, rolling the fabric onto a dowel so it will feed evenly, & then feeding it through the pleater would probably take longer than using the sewing machine as shown.
Amy June 22, 2011 - 00:25
Thanks so much for this simple and practical tutorial! I made a skirt from vintage sheets and posted about it on my blog. I linked back to you, of course! 🙂
Amy from Gabriel’s Good Tidings
http://gabrielsgoodtidings.blogspot.com
simone June 22, 2011 - 10:31
This is fabulous. New follower. Cheers
Melissa June 22, 2011 - 13:22 – In reply to: Diana
Diana, I’ve never had a problem with the elastic thread. The kind I buy comes on a wooden spool, but not a typical thread spool. This is what it looks like:
http://www.joann.com/joann/catalog/productdetail.jsp?pageName=search&flag=true&PRODID=prd13355
Several companies make it, so you might not find this exact one in red packaging, but it sounds like what you used is a lot thicker. When not pregnant I wear a 4 as well, so true elastic thread should work better for you. I hope you’re able to find some!
ABC's of DIY | The Shoestring Budget June 22, 2011 - 14:55
[…] S. Shirt to Skirt […]
tina b June 22, 2011 - 15:35
Ack! I tried this last night…so excited about it. BUT, my sewing machine apparently isn’t made to work with elastic thread or something… There was no shirring action going on…just a really loose sewing job. It was like the elastic wasn’t being pulled while sewing so that there was no stretch there… Tried the steaming after sewing trick. No dice. At least I only lost $2 on my shirt. Anyone else have this problem??? Help!!! I wanna wear this skirt!! 🙂
samantha June 22, 2011 - 20:54
your skirts look very pretty . now that I have read all the questions, I now think my machine may not handle elastic thread also. Are there any alternatives I could do to get the same effect should I not be able to do the shirr thing? Please email me and let me know.
Kate June 22, 2011 - 22:02
I’m attempting to make this awesome skirt, but my shirt’s not tightening up as I shir. What could I be doing wrong? I’m not pulling on the shirt (tried that, ugly results). I’m just feeding it through and making sure the fabric stays flat. After 5 rows it’s not really “bunching”…any ideas what I’m doing wrong?
Lori June 24, 2011 - 10:46
This was so easy and cute!!! T-shirts are on sale at Hobby Lobby this week so I was able to make a skirt and I also used the same idea, added a few more rows of shirring, and ended up with a cute bandeau top for my daughter. Check out my results here:
http://2boyslilprincess.blogspot.com/2011/06/turn-shirt-into.html
Favorites new and old. | Tallymomma's June 24, 2011 - 11:49
[…] because I have been gifted a great new sewing machine I have been checking out Sew like my mom’s web page for simple and easy sewing […]
Leslie June 24, 2011 - 18:06
I know this is an old post but I saw it linked on moneysavingmom and had to try it. Thank you!!!! I’m hooked!
http://more2les.blogspot.com/2011/06/shirt-to-skirt-in-10-minutes.html
Meghan June 24, 2011 - 18:10
I made mine today!! You weren’t joking! These actually ARE easy!! I love them! It cost me $1.00 at a local thrift store (that supports local families) and I had to spend $1.00 on the elastic thread bc I didn’t have any.. AWESOME!!!
Ellen June 26, 2011 - 23:08
I LOVE this idea! I went out and bought some elastic thread today and started out, but my shirt simply refused to shirr! It stayed flat as ever and after googling my problem, trying MANY solutions, calling all the sewing geniuses I know, I still do not have any shirring action. Do you have any advice? Could it maybe be the weight of the teeshirt?
Thank you SO MUCH!
Ellen
Staci June 27, 2011 - 01:03
I LOVE THIS and can’t wait to make a few for me and for my girls. I linked you from my blog danggoodfinds.com. Thanks
Christine June 27, 2011 - 01:57
Wow, this is so cute and looks so comfy! I cannot wait to try it…..
Melissa June 27, 2011 - 14:05 – In reply to: Ellen
Those of you having trouble getting the shirring to work–
you might want to try adjusting the tension on your machine. Sometimes I’m able to just sew along with no problems, other times I need to adjust the tension a little bit, sometimes fairly drastically. Unfortunately I can’t sit down at all your machines and help you fiddle with it, but that’s what works for me. I really only know how to do this on my sewing machine as well as my Mom’s, and my sister is able to do it, too. We’ve got 3 very different sewing machines, so I think it should be doable for most of you with a little adjusting.
I hope you’re able to make it work!!
Emily June 28, 2011 - 15:39
I can get my shirt to shirr but it doesnt stretch out, the fabric moves along the thread. Any suggestions? My tension is at 9 and the thread lenght at 6.
CANDY June 28, 2011 - 20:35
Hi, I love these skits and being a plus size they would be cofty to wear espically around the house, any ways I don’t have a sewing machine at the moment and no place to really sew at. can these be done by hand I’am pretty good sewing by hand. please let me know.
thanks candi
T-Shirt Skirt • Saving by Making June 30, 2011 - 10:53
[…] I saw this tutorial for how to turn a t-shirt into a skirt, I was hooked […]
A Summer Skirt from a T-Shirt | Saving a Bundle June 30, 2011 - 10:54
[…] have added this to my list of sewing projects. Sew like my mom has a tutorial on how to make a summer skirt from a t-shirt. This looks like a simple, cheap sewing […]
Diana June 30, 2011 - 10:55
Yay!! I got real elastic thread and it’s so much better! I posted a blog post about my skirt along with some tips I came up with along the way if you’d like to see it 🙂 http://www.savingbymaking.com/2011/06/t-shirt-skirt/ Thank you SO much for your help!
christina July 02, 2011 - 00:39
i couldnt find any shirts that were long enough so i bought some fabric. i think that the fabric is too heavy though. doesnt seem to “pucker” enough… =( any ideas on how to make it “pucker”???
JamieS July 03, 2011 - 10:34
Great idea! I will have to make one for myself!
~JamieS@ Scattered Thoughts of a Crafty Mom
Michelle July 09, 2011 - 02:06
Hello! Thank you for sharing this great tutorial! I wanted to try it – but I had a problem – my project didn’t shirr 🙁 I used materials due to instruction of your tutorial and this linked shirr tutorial, but probably our Polish elastic thread are diferent than yours 🙁
Sewing Session: T-Shirt Skirt « Sweet Tea & Grits July 09, 2011 - 06:39
[…] Like My Mom shows you how to take a thrift store t-shirt and turn it into a skirt. I love this idea and the skirts look like they are so […]
Abs July 10, 2011 - 14:35
Do u have to have elastic string to shirr
Kristina July 12, 2011 - 11:13
Love this!!!! What are the things that I can do with the top of the T-shirt
Emily July 14, 2011 - 00:23
I love these. I’ve seen sleeveless shirts that look very similar. Has anyone tried making a shirt using the same shirring method? How did it work out?
para os bebês que estão a caminho | Tule de Ló July 16, 2011 - 19:39
[…] Gold Dots Dress 2. Dress 3. Most Flattering Shirt Dress 4. Sunshine Daisies Bottom Mellow Dress 5. Shirt Skirt 6. Bubble […]
Cindy July 18, 2011 - 17:41
What am I doing wrong? I am shirring, but the fabric isn’t really gathering or becoming any smaller than it was to begin with. Any ideas? I am using tshirts.
Thanks! Cindy
Amanda A. July 20, 2011 - 07:40
Thank you for this tutorial. I have made 3 skirts so far and I wear one every day. EVERY day. They are cool, comfy, cheap and so easy to make. THANK YOU!
Aunna July 22, 2011 - 13:15
I am so glad I found this tutorial! I featured you today @ Rips in My Jeans!
Jen July 23, 2011 - 22:26
WOW! I am so glad I stumbled across this – it is EXACTLY what I have been looking for! Went shopping for skirts about a month ago and couldn’t find anything…so now tomorrow, I’m hitting the thrift stores and the fabric store and getting started! Thanks for posting! And the instructions and photos are great!
Daily Craft August 04, 2011 - 10:43
Great project! I just wanted to let you know that we featured this project on our Facebook page with over 17,000 fans. We’d love it if you’d use our Featured Blogger button, available at: http://www.dailycraft.com/thank-you-for-crafting/. Our audience loved the project and we look forward to sharing more from you. Please let us know if you have any questions or projects you’d love us to feature! Thanks!
Jenni August 05, 2011 - 15:13
I followed your tutorial and made several skirts (like eight, I think!) and one tube-like shirt (just added a ton more rows of shirring). They turned out GREAT! I blogged about it and linked to your instructions throughout my post! Thanks again for the awesome idea!!!!
http://jennisrandomramblings.blogspot.com/2011/07/discovering-world-of-clothing-up.html
T-shirt Skirt « Lady with the Red Rocker August 10, 2011 - 15:39
[…] skirt! For real!) If you can sew a straight line, you can make these. I found this idea from Sew Like My Mom, where you take a man’s large/x-large shirt and turn it into a skirt. Um… genius!! […]
prestiti cambializzati August 14, 2011 - 12:32
Sources…
[…]check below, are some totally unrelated websites to ours, however, they are most trustworthy sources that we use[…]……
Upcycled and Refashioned Wardrobe Additions « Storied Yarns August 18, 2011 - 19:07
[…] up, another T-shirt project! This time I made a skirt. I’ve been loving this tutorial, but after closer inspection I realized that the 99-cent green tee I bought at Goodwill yesterday […]
Laura August 23, 2011 - 10:33
cute! im going to make some for my sisters!! 🙂
I have a question though — when i buy the elastic thread how many do i need for one skirt? I’m going to be making 7 of these skirts so how many spools of thread would you said to buy?
Thanks!
Sarah H August 23, 2011 - 13:35
I wanted to share (after going to Joann’s and having a store employee tell me they don’t carry elastic thread lol) that at Joanns (and I guess anywhere that carries gutterman thread) that they have elastic thread right with the cotton and other specialty threads in the gutterman thread “stand”. They also now carry navy and red I think in addition to the black and white!
Awesome idea! I think I will try to piece some tshirts together in vertical stripes leaving the hems and see how it turns out! Thanks!
Melissa August 23, 2011 - 21:55 – In reply to: Sarah H
Laura, I honestly have no idea. I’m sorry!! I just keep several spools of it laying around and use it whenever. It also depends on how many rows you do on each skirt. I think you could probably do 3 skirts per spool, so I’d go ahead and grab 3 just to be on the safe side. They’re very inexpensive, and you can always take one back if you don’t use it!
Sarah, that’s awesome to know!! Traditionally stores sell elastic thread with elastic, not thread. When readers tell me they can’t find it, I always ask if they looked with thread or elastic and to go back and try again. I usually buy the Dritz brand (http://www.joann.com/joann/catalog/productdetail.jsp?pageName=search&flag=true&PRODID=prd13355) and have never had any problems finding it in stores. But I’m really excited to know that Gutterman makes it in other colors, too!
Onita August 29, 2011 - 23:43
fabulous!!! i tried this out and blogged about it, linking back to you 🙂 THANKS for the awesome tutorial!
http://mylifeandwhatiheart.blogspot.com/2011/08/elastic-love.html
Tutorial: skirt and matching flowers « Navy Wife with a B.L.O.G. {Big Love of God} September 08, 2011 - 14:24
[…] decided to follow another blog for this super cute and super easy Shirt Skirt Tutorial. I happened to go shopping at Old Navy on Father’s Day weekend, and they had men’s […]
Maren September 08, 2011 - 21:01
I just got a bunch of men’s tanks on clearance at target for $1.49!!! Yay for new skirts!
Meagan September 16, 2011 - 12:12
This is very impressive! I am excited to try it out 🙂 You make it seem quite easy!
My $1 Skirt | Another Texas Family | Another Texas Family September 17, 2011 - 16:22
[…] is the sewing expert and made this skirt for me. I saw the recycled t-shirt skirt idea on a blog (here) and asked her to […]
Anna September 20, 2011 - 06:32
First tutorial I’ve seen that isn’t a buttondown shirt. It does look quite easy to do. Only daunting part for me is the shirring part. Yipes. >_<
Emily @ Make It Happen Mama September 23, 2011 - 20:40
I mentioned this article on my blog today! Thanks for such an awesome tutorial 🙂
http://makeithappenmama.blogspot.com/2011/09/tale-of-three-tees.html
erymnnuaday November 03, 2011 - 18:47
[url=http://acnert.pl.ua]tiger? tiger
[/url]
Wabereazy November 07, 2011 - 16:54
[url=http://afpol.if.ua]микон ,/,
[/url]
Craft Ideas by pj123 - Pearltrees December 06, 2011 - 13:29
[…] And what it looks like on the outside. It doesn’t stick out or look funny at all when you wear it. The Shirt Skirt | Sew Like My Mom […]
Being Bored | Oats and Beans and Baby Grow December 12, 2011 - 08:22
[…] skirt, a style I love, made from men’s t-shirts. So cool! Pinned! Will I ever get around to […]
pillowsalamode December 19, 2011 - 12:48
Love!!!
Tenessa December 27, 2011 - 19:04
Does anyone know how shirr by hand, or know a website I can got to for instructions?
becky December 28, 2011 - 04:53
I loved this.my first experience with shirring you gave me the confidence to try it out Thank-you very much it is fun and addictive in so many fun ways. Again thank-you very much for sharing.I came across you on randon-tutorials so i found 2great things when i came across this website.
clothes by charbabyserendipity - Pearltrees January 15, 2012 - 18:35
[…] They’re perfect for summertime. They’re perfect for when you’re pregnant, they’re perfect for after you have the baby. They’re perfect if you change size or shape or hate your clothes. They’re just simply PERFECT. Comfortable, casual, and cheap. The Shirt Skirt | Sew Like My Mom […]
It works! | Back to Basics January 16, 2012 - 13:18
[…] The Shirt Skirt from Sew Like My Mom […]
Luckyldyntx January 24, 2012 - 15:15
I am in search of large enough t shirts to try this method for myself. It seems easy enough for me to make.
Thank you for the instructions.
Ellen Jacobs January 30, 2012 - 12:37
I tried the elastic thread in my bobbin and an awful noise (squealin and squeeking) came from the bobbin area. Have you ever heard of this happening?
Even with the noise the machine was doing the shirring just fine. I’m just afraid it might be damaging my machine. My machine is a 2 year old
Janome Horizon.
Ellen
Arkista January 30, 2012 - 13:28
This seems simple enough for a girl going t full time skirt wearing!!! 🙂
Kate January 31, 2012 - 09:10
This is so cute! I just included it in my “Top 10 Things to Make Out of T-Shirts” post @ http://www.cheapcraftymama.com... feel free to stop by and grab a “featured” button!
Kelly February 03, 2012 - 16:10
Sooo.. I have an issue.. What KIND of elastic for the bobbin are we talking about? I bought some and it was too tight.. then I bought more and it’s not really doing anything.. I feel like it’s super tiny and it’s not going to ‘shirr’ it? Any suggestions?
Charissa February 06, 2012 - 11:27
I love you’re tutorials, so detailed. I like that you include where you would change things or what was difficult. Thanks so much for the inspiration
Pinterest Shirt Skirt « Knitwerks February 17, 2012 - 23:08
[…] From the first time I saw this post, I was fascinated. It seemed simple enough. https://sewlikemymom.com/the-shirt-skirt/ […]
madebyNiki February 18, 2012 - 01:56
I bought a skirt similar to this at Old Navy the other day in a light gray color. It is sooo comfortable and they didn’t have my size in other colors. I’m so happy I came across this tutorial because I want to make more. I am 25 weeks pregnant and I need all the comfort I can get. Thanks soo much!!
http://madebyniki.blogspot.com/
خياطة وتفصيل February 21, 2012 - 07:49
This seems simple enough for a girl going t full time skirt wearing!!! 🙂
Pinterest Week 2 « Knitwerks February 21, 2012 - 18:11
[…] https://sewlikemymom.com/the-shirt-skirt/ […]
Becca@CreatingFamilyConnections February 25, 2012 - 19:30
These are SWEET! I just rediscovered my love for sewing, and sewing and modifying skirts is a favorite of mine. I will have to try these! Thanks for the tutorial.
Melissa March 01, 2012 - 10:07
Hey, I love this website!! I used this at school, when I was doing my options and it helped soooo much! Thankyou!! I love this shirt skirt!! XD
Kris10 March 05, 2012 - 10:55
I LOVE this project and have already made 2 skirts – THANK YOU for sharing.
I did have some trouble with the elastic bobbin thread becoming too loose in a few rows…should I wind the elastic really tightly around the bobbin to prevent this from happening? I hadn’t changed my tension, so not sure why this happened…
Thanks again!!
Melissa Evans March 06, 2012 - 16:38
This is SERIOUSLY by FAR the BEST tutorial I have ever seen! So So SO So So useful!! Thank you SO much….LOVING these skirts! I plan on trying this 🙂
T-shirt March 09, 2012 - 05:47
Beautiful red skirt.
25 Reconstructed T-Shirt Tutorials - darlingadventures.com March 09, 2012 - 17:25
[…] The Shirt Skirt – Sew Like My […]
KarenK March 12, 2012 - 23:26
As I am shirring my first shirt tonight I am noticing that the elastic bobbin is giving me trouble. It seems to be getting stuck. Any one else having problems? Maybe my elastic is too thick? I’m certain that after I get over this ‘operator error’ this is going to be a breeze 🙂
خياطة وتفصيل March 16, 2012 - 14:07
Sewing easy way will I try it Thank you
Regina March 18, 2012 - 15:32
I love your “shirt skirt” and want to definitely try this. I have never used elastic thread, but I have been sewing since I was 16. I have a question though… have you ever tried to put pockets in the skirt? I know that means cutting two pieces instead of just one circular piece, but how difficult could it be? I have a pocket fetish… and feel naked without them.
Any suggestions on how to do this?
Thanks!
Sewing | Pearltrees March 20, 2012 - 01:24
[…] I measured, cut, and finally, with trepidation, I started sewing. Less than 30 minutes later I was wearing my Shirt Skirt!! The Shirt Skirt | Sew Like My Mom – StumbleUpon […]
Juli March 22, 2012 - 13:33
Love this idea!! I’m very new to the sewing world, I’ve only had my machine for about 2 weeks. Now that summer is approaching I’m looking for cure skirts/dresses to make. I came upon this on Pinterest (and will be repinning it!). I have a couple of questions. First, do you trim down the sides at all? Do you leave it full circle while sewing? How do you know it will fit ok? Also, could the same be done using just regular fabric? You know, like sewing two together then doing the shirring? I guess you’d have to hem the other end, but that’s not too hard either… I’m so excited to try this (If you can’t tell). Also, is there a certain stitch I should use with the elastic of just like I’m sewing anything else? Sorry for all the questions!! Thanks in advance!
Ginny April 02, 2012 - 15:12
What a great tutorial! I love reconstructing boring t-shirt into something fabulous like this. Who knew you could make a skirt from a shirt and it would be so easy? I like it so much, I ended up including it on my blog… http://darlingadventures.com/?p=574
Thanks!
Holly April 04, 2012 - 18:23
I *love* this idea!! I’m dreaming of a rainbow of summery skirts!
{30} Fun & Useful Things to Do with Old T-Shirts April 06, 2012 - 17:02
[…] 1. Adult skirt. […]
Vicki April 10, 2012 - 23:01
Love this! However, my 24″ (48 around) skirt after shirring is quite small. It shrank way more than 2″. Any suggestions before I try again.
Hemming A Skirt – Try New Adventures « A Wife Loved Like The Church April 11, 2012 - 21:15
[…] outcome. And it was a great project to get me back in the sewing saddle. Perhaps I’ll tackle this skirt […]
Jenny April 12, 2012 - 07:48
Love this idea, Wonder if youd make me a 3xl one if I sent you the money!! 😛 (I dont own a sewing machine)
Tutorial: Little girl’s ruched A-line dress | Girls Dream April 14, 2012 - 09:54
[…] …52 Free Dress Patterns :From An Igloo: “In the Garden” Shirred Twirly DressThe Shirt Skirt | Sew Like My MomGirls’ Clothes Tutorial Round-Up « Sew,Mama,Sew! Blog1-Hour Dress – CraftStylishTaDa! […]
Betty April 16, 2012 - 22:20
Hi, I just made the skirt tonight. I didn’t know about elastic thread & I sew!! This was a fun project! It is ridiculously comfy!! Love it! I will be making sundresses for my grandaughters, Thank you!!
wibiadbalaype April 18, 2012 - 14:51
[url=http://games-review-it.com]Video Games[/url]
[url=http://games-review-it.com/review/the-witcher-2/]The Witcher 2 – add your review[/url]
Tania B. April 18, 2012 - 16:53
So, I have to thank you for a great tutorial. Just finished my first and I’m now hooked. Great job and thanks. This will save me this summer!
TGIPinterest. Earth Friendly Fashion for Eco Gangstas. April 19, 2012 - 22:24
[…] 4. Summery t-shirt skirt. […]
Easy top / skirt « Get Crunchy May 04, 2012 - 08:41
[…] saw this turorial on Sew Like My Mom a while ago, and have been dying to try it. It is so well-explained, and […]
Salsa and Shirt Skirts - Tidy Tangle May 04, 2012 - 15:50
[…] night, with the help of this tutorial that I found on Pinterest (where else?), I turned this $2 goodwill […]
Leonie May 05, 2012 - 13:28
Thank you so much! Now I will definitely practice shirring. I must say I was a little affraid of it. Looks easy!!! YAY!
Mandy May 06, 2012 - 22:43
How amazing. I’ll definitely be trying this!!! Great job!
Sewing | Pearltrees May 09, 2012 - 21:39
[…] to a bmw: Free Sewing Patterns: Womens Clothing The Shirt Skirt | Sew Like My Mom When I met Dana , I fell in love with the skirt she was wearing . She made it herself (obviously) […]
Janelle May 11, 2012 - 08:00
I have been trying to make this skirt for the past two days… i CANNOT get the tension right and i’m getting so frustrated because i feel like i’m wasting my materials.
I have tried adjusting my tension both ways, leaving it on auto, and rewinding my bobbin … i just can’t get it right.
do you have any more suggestions??
Mother’s Day gift ideas! | Sew Like My Mom May 11, 2012 - 11:02
[…] THE SHIRT SKIRT […]
shelley May 12, 2012 - 06:56
thank you so much, for so long i have wondered how to make these as i love this style as both a skirt, or right now (overwight) as a top, and i wear many tull legnth dresses that the top is like this, and have at times been wearing them as nightgowns, but now i c an make my own (love that the elastic built in gives some support to my chest even without a bra for sleeping or casual summer shirt when home alone with my hubby.
will be trying this tonight likely haha.
A Pinteresting weekend « Cookies and Crafts May 14, 2012 - 11:50
[…] few months ago, my sister Pinned a link to a tutorial for ways to upcycle t-shirts into a skirt with a shirred elastic […]
Penelope May 15, 2012 - 15:40
NOT WORTH IT 🙁
I have a Sears Kenmore and this didn’t work out at all. Why? The tutorial is great, even though I had to look elsewhere for instructions on threading elastic on a drop-in bobbin (totally different!). The issue was it thoroughly screwed up my bobbin tension. I did one skirt, and it worked out well – I’m still wearing it! – but my bobbin has never been the same. Maybe more advanced sewers can do this without worry, or people who can get their hands on two machines, but I wasn’t able to readjust my bobbin tension to the perfect place so it wasn’t worth it for me.
Melissa May 16, 2012 - 12:20 – In reply to: Penelope
Penelope, I’m sorry your machine is messed up. I’ve never adjusted my bobbin tension so I wouldn’t even know where to begin with that. Two machines aren’t necessary, but some machines can’t do the elastic thread. It just won’t work, for whatever reason, it doesn’t like the thread. I hope your future sewing projects come easier and with less headache.
RUNWAY | Pearltrees May 23, 2012 - 04:08
[…] | All Lacquered Up Have you seen the ombre manicure that was featured in InStyle Magazine ? The Shirt Skirt | Sew Like My Mom When I met Dana , I fell in love with the skirt she was wearing . She made it herself (obviously) […]
Mom Prepares May 24, 2012 - 12:32
We love this tutorial!! We’ve featured your post on Mom Prepares: http://momprepares.com/2012/05/17/nine-free-and-awesome-sewing-tutorials-for-mom/3/
Amelia May 24, 2012 - 15:35
Hi! I’ve just started sewing and tried to shirred a 3XL shirt, but it shrunk so much it wouldn’t fit me. It shrunk to half the original width. It’s now my daughter’s 😀
Could it be that I shirred to many lines? Or should sew more than 1/4″between gaps?
Thanks!
lisa May 26, 2012 - 10:51
I absolutely luv your idea. ty for sharing ((hugs))
M May 26, 2012 - 22:16
absolutely amazing! wonderful idea
Caroline June 01, 2012 - 17:42
These are cute, but what size are you? What about a plus sized woman? Sure these will look great on a size “nothing” but what about those of us with curves? And I don’t mean pregnant bellies that look like a 16″ softball.
Marcie June 06, 2012 - 23:09
What material is the t-shirt supposed to be made of? Cotton? Polyester? I have cotton and the elastic is not tightening.
Maddi June 13, 2012 - 21:24
I am having the same problem as Marcie…I made one with a cotton shirt and it did not tighten. I found a place online that told me what to set my tension etc to to shirr, and it tightened a little, but was still way to big for me. What kind of tshirt fabric do you need?
Irene June 14, 2012 - 18:50
I’ve had this tutorial bookmarked for such a long time now and I fiiinally got around to getting elastic thread. It was pretty easy to make! I like that it was so simple and I got such a cute skirt out of it. I definitely want to make more for the summer time! I really want to try a striped one!
Caroline, you asked about the sizing. I used an XL shirt. I am a size 14 and it fits me a bit snug but I don’t mind in case it stretches out while I’m wearing it. I may go one size bigger next time. Hope that helps!
Melissa June 14, 2012 - 21:34 – In reply to: Maddi
Hi Maddi,
As I’ve told several before you, unfortunately I think there are some machines that just don’t shirr. It’s not going to make a difference what you do, yours just won’t do it. While at that sewing weekend at Whipstitch, there were several women whose machines wouldn’t put any tension on the elastic no matter what was tried–and several of us tried for a VERY long time! So it just may not be possible for you. Sometimes, depending on the thickness of the material things will shrink more or less, but I never have a problem. It sounds like it just might not work for you. I’m so sorry!
Qui no té una samarreta original és perquè no vol | wondercoses June 18, 2012 - 05:32
[…] Sew like my mom […]
Maddi June 18, 2012 - 23:36
Oh bummer, thank you Melissa. I have a brother machine and I found this youtube video http://www.youtube.com/watch?v=vcELEGN9Rrk that said she tried and tried and figured out a way to shirr on it, but maybe not. I will maybe try one more time and play with my tensions more. I’ll let you know if I figure it out!
Thanks again!
mom2kmjx2 June 26, 2012 - 00:10
I made one today following your pattern. didnt come out quite right but will work on it. very comfy none the less. I hope you can check it out.
Tanya July 02, 2012 - 10:27
I have wanted a sewing machine for as long as I can remember! And I got one 2 months ago for my 30th birthday! I’ve made two of these skirts… took me about 30-40 minutes each… and i am a TOTAL beginner! People can’t believe I made them with so little experience! … yours look much neater than mine – but I LOVE THEM! thank you!
خياطة وتفصيل July 07, 2012 - 06:13
very nice thank you so much 🙂
Nicki July 07, 2012 - 15:51
For those who can’t shir, I think you could zigzag over the elastic thread and then pull the elastic thread to the desired length. I could be a workaround for you.
Myrna July 07, 2012 - 18:33
I can’t get this in my head. Do you sew on the right side or the wrong side, and you don’t measure the elastic, just sew it on flat fabric? And it shrinks up to fit anyone’s size? These are really cute, want to try it!
GBrial July 10, 2012 - 08:12
Thanks a lot for that tutorial ! It is so easy to make… I used a women’s shirt to make a little girl skirt, and added some ruffles. You can see pictures on my blog : sewingpot.blogspot.com. Bye !
SewTanya.co.za » Blog Archive » 30 minute skirt from a shirt July 13, 2012 - 11:42
[…] The original tutorial is on Sew Like my Mom. […]
georgia stewart July 22, 2012 - 02:14
you rock on creativity!!!!!
Helen @ Blue Eyed Beauty Blog July 22, 2012 - 21:42
I love the way these skirts look! I am excited to learn how to shirr also!
Helen
Blue Eyed Beauty Blog
Photosarah Crafts August 15, 2012 - 01:22
I’ve made a shirred skirt from a sheet, but didn’t think about using a t-shirt. I’ll have to try this soon. I love shirred skirts. They are so comfortable and I bet even more so in a knit!
Felicia August 17, 2012 - 02:06
I would like to add a few more line of shirring and use these as cover ups for my littles on the beach.
خياطة وتفصيل August 17, 2012 - 09:12
thank you so much