
Peasant Dress September 29, 2010 – Posted in: Sewing, Tutorials
A friend came to me recently and asked me to make 2 peasant style dresses for her daughter. I readily agreed knowing they were all the rage these days, and I figured it would be a great chance to learn how to make them. I hunted around for patterns, both paid and free, and didn’t find anything that struck my fancy. Then I stumbled on an old favorite blog of mine and found the perfect framework for the dresses I wanted to make.
I spent some time reading, measuring, and experimenting before I began cutting and sewing. I was surprised how quickly they came together, and the options to personalize these are endless! Sofie loved each one I made and had no problems modeling for me when I wanted to photograph her.
I’m so excited to have perfected a way to make the quintessential Fall Frock!
 |
 |

 |
 |

 |
 |

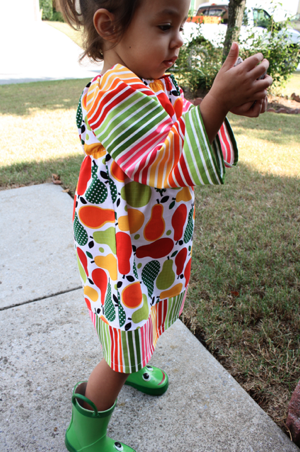
I actually whipped up all 3 dresses in one day! Once I started, I just couldn’t stop! This elephant one is for Sofie and we’re mailing the other 2 to our friend. I practiced on one for her first so I could work the kinks out for the other 2. Sofie’s is short, so I think it’ll be the perfect fall tunic! I also did the elastic closer to her waist but decided I liked it better higher. So after some tweaking, I developed this pattern that I’m sure to make over and over in the coming months!


 |
 |
To make the Peasant Dress you’ll need:
-1 yard of fabric. I used two 1/2 yard cuts so that I could have contrast sleeves and trim
-30″ of 3/8 inch elastic
-thread
I got the basis for these dresses from this blog post. Go read it, all of it, then come back.
https://indietutes.blogspot.com/2007/07/peasant-blouse.html
No really, go! I’ll wait.
Pretty easy, right? Exactly! It wasn’t hard to turn this little shirt into a dress. You’ll need to start with cutting it out. I made this basic template from the measurements she provided in her tutorial.
I took a scrap piece of paper and measured in 2″ from the side and down 5″ from the top.

I traced the line, then starting around 4″ down, I started to curve my line until I got to the side of the paper. I just freehanded it.
 |
 |
**My dresses are made to fit a 2T/3T. You’ll need to use the IndieTute tutorial to help you for different sizes.
I cut my dress 18″ long (the length of 1/2 yard of fabric) and 16″ wide. I used a fabric pencil to mark the arm holes at the top and cut them. Cut 2.
I cut my sleeves 12″ wide and 14″ long. I then cut the same arm hole shape from them. Cut 2.
The contrast at the bottom of the dress is 4.5″ long and 16″ wide. Cut 2.

To put elastic around the bodice, use a fabric marking pencil or pen to mark a line approximately 6″ from the top edge of the dress. I drew mine 1″ from the bottom of the arm hole.

Sew the contrast to the bottom edge of the front and back pieces of the dress. Press the seam toward the dress.

Designate a dress piece as the front. With right sides together, match arm holes and stitch.

Sew the other arm to the same side.

Then sew both arms to the dress back.

It should be open along the bottom of each arm and down the sides.

Starting at the bottom of the contrast, sew 1 seam that goes up the side of the dress and ends at the wrist.

Repeat on the other side.

Next, put a casing around the neck.

I used a 1/2″ casing for my 3/8″ elastic. It was perfect! Just turn down 1/2″ and press, then 1/2″ again. Press well.

Sew around the casing at 3/8″ seam allowance. Leave a hole to thread your elastic through, but don’t do it yet!

If you don’t want the elastic bodice, skip this part.
My elastic was very soft and very stretchy. I used 16″, which is the width of 1 side of the dress. Mark the middle of the elastic with a fabric marking pencil.

Pin one end of the elastic to the side seam, lining the top of the elastic with the line you drew across the fabric.

Estimate the 1/4 mark on the elastic and pin it to the middle of the dress.

Then pin the half way mark to the seam on the other side. There should be 8″ of elastic left over.

Start by sewing a few stitches to secure the elastic.

Then hold the pin in the middle and pull so the elastic lays flat, lining up with the line you marked across the dress.

Grab a few inches up on the elastic, keeping it stretched

And swap hands so you can use your fingers to hold it down while you sew. Go slow, and use your other hand to help guide it from the back of the machine (I couldn’t take pictures while I did this).

Sew all the way to each finger


Then repeat. When you get to the other side seam, just pull the elastic, keep it lined up with the line, and continue sewing it down on the other side of the dress. When you get back to the start, overlap the elastic a little and back stitch to secure.
 You should have a nice, gathered waist!

Now take 14″ of 3/8″ elastic, and thread it through your neck casing with a safety pin.

Secure the ends of the elastic together and pull into the casing.

I like to sew a little loop of ribbon when I close up my hole to act as a tag (I know, I need to get labels!).

Top stitch along the bottom, making sure to catch the seam from sewing on your contrast.


Then hem the bottom and the sleeves and you’re finished!! A perfect little dress for cool Autumn days!
 |
 |

51 Comments
Tia September 29, 2010 - 22:58
I love them!!!! They look amazing. I love Sofie’s dress and boots. Can’t wait to get them.
Jennifer September 30, 2010 - 14:45
These are too flippin’ cute! Fantastic job as always! I love them!
Betsie October 02, 2010 - 08:07
I love these! Your fabric choices are always so perfect. 🙂
Jen October 03, 2010 - 16:43
I agree, peasant dresses/tops are all the rage! I’ve made one of each for my 3 year old. I love the brown/cream fabrics and the contrasting fabric on the bottom. Great tut.
Amy Chappell October 04, 2010 - 17:44
I Love these dresses! I might just have to try my hand at them for my little munchkin! Thanks for sharing.
Lauren October 10, 2010 - 14:15
<3 these! Would be able to make some for Makenzie and baby?
Bohemian Hijabi November 11, 2010 - 21:26
I am so glad to have found your blog! After pouring over similar dresses on Etsy.com, then pouting because no one was selling them in my daughter’s size, I realized I wouldn’t have a choice but to make them. I had no idea it was so easy! I love the fabric combinations you used.
Lisa November 30, 2010 - 13:54
I wanted to make my daughter and her dollie a peasant dress like this – thanks for your tut!
Lisa Bass April 14, 2011 - 14:06
Thank you! Thank you! Thank you! I’m making Easter dresses for my girls!
Tot Tuesday: How to Make a Peasant Dress May 17, 2011 - 19:06
[…] Dress pattern from YouCanMakeThis.com) or you can use an online tutorial to get sizing info (I like this one here and this one […]
Jana August 13, 2011 - 23:34
Trying to make a dress with elastic under the bust & was doing it in a far more complicated way causing much stress between me & the sewing machine. Thanks for a great tutorial! I am a new follower!
Sweetbug October 15, 2011 - 22:14
Been looking for easy peasant dress tutorial. Love your website.
Thanks,
Sweetbug October 15, 2011 - 22:16
I am a new follower.
Sarah October 18, 2011 - 14:14
This is gorgeous. I’m thinking of making a dress for a friend, but need a size 6-9 months. Would it be easy to modify this? Is this one a size 3?
Heather November 14, 2011 - 00:26
This was by far the easiest and best tutorial I came across for making THE cutest peasant dress I have ever seen!! Thank you so much – I LOVE it!!
Sarah – I made 6/9 months for my niece… I kind of guessed on the arms, but made the length 15″, which is the same as the pillowcase dresses I’d been making for her, and they came out darling and fit perfect.
Stephanie November 30, 2011 - 17:16
LOVE the dress!! I was wondering where you got the elephant fabric?
Erika January 11, 2012 - 00:39
Love, love, love! Very simple and too cute. So glad to find a long sleeved dress for the cool weather. New follower, love your site!
Alicia February 03, 2012 - 09:20
This is ADORABLE! I’m dying to make one in a 4T. Has anyone attempted this or have suggestions about measurements? It’s for a friend and I don’t have anything to measure! :'(
خياطة وتفصيل February 20, 2012 - 09:36
LOVE the dress!! I was wondering where you got the elephant fabric?
Melissa February 20, 2012 - 14:25 – In reply to: خياطة وتفصيل
I bought it many years ago and I have no idea where. That was before I paid more attention to where my fabric comes from. I’m sorry!
Becca@CreatingFamilyConnections March 10, 2012 - 18:20
These look so cute! I have 2 nieces so I just may have to look into creating a couple…
Michelle March 16, 2012 - 20:01
Found your tutorials on Pinterest and LOVE your blog! They are so simple and easy to follow thanks so much!
A Few of My Favorite Sewing Tutorials | Plants and Pillars April 10, 2012 - 16:28
[…] There are several peasant dress tutorials out there, you can find the one I used here. […]
Neisha April 21, 2012 - 00:30
Is there any way you can send this and the pillowcase dress tutorials to me in a email please 🙂
Neisha April 21, 2012 - 00:31
And the romper one too if you can thanks
Connie Panike May 13, 2012 - 00:30
I made a bunch of your dresses for Little Dresses for Africa. I turned them into summer dresses by not adding the elastic around the waist and and by making the sleeves short–7 or 8 inches. It wasn’t hard to make them into larger sizes–up to an 8-10. I also discovered it works great for a nightgown. I made nightgowns for 4 of my granddaughters–3 in one afternoon. I’ve been passing this on to lots of others who have little ones and want something simple to sew.
short sleeve peasant dress tutorial | Sew Like My Mom July 04, 2012 - 16:44
[…] need to read my peasant dress tutorial for this to make […]
Kaylee Eubanks September 09, 2012 - 23:23
Do you happen to remember what the fabric designer of the brown dress was?
Melissa September 12, 2012 - 16:45 – In reply to: Kaylee Eubanks
Yes! It took me a few minutes of searching, but I found it. It’s MoMo Freebird by Moda. You’d have a hard time finding it in quilt stores, but there’s still yardage available on etsy. Happy Sewing!
Dress for Less « Front Porch Sittin', Sweet Tea Drinkin' September 13, 2012 - 09:32
[…] https://sewlikemymom.com/peasant-dress/ […]
Alex September 21, 2012 - 10:50
Hi,
My daughter has a 21.5″ chest but I don’t know what length to cut the elastic that goes around the chest? any ideas anyone????
Thanks
Mira (Sewing the Littleheart Collection) September 23, 2012 - 16:40
I linked back to your tutorial on my post about different ways to change patterns for various outcomes. You can find the link here http://sewtlc.blogspot.co.il/2012/09/little-changes-big-outcomes-how-to.html
Thank you for the tutorial!
Lori October 05, 2012 - 15:53
Loved this dress. Made a Halloween version for my girl!
http://metrymomma.blogspot.com/2012/10/happy-halloween.html
Free Children's Boutique Sewing Patterns! - Minnesota Mama's Must Haves October 12, 2012 - 16:42
[…] FREE children’s boutique sewing patterns. I intend on eventually making them all! Adorable Peasant Dress Easy Bubble Dress Ruffled Pants Tutorial Apron Dress Pillowcase Dress Ruffle ShirtNow go sew! […]
Patrice October 24, 2012 - 01:00
Thank you for sharing this! I’ve made two of these dresses following your instructions and they turned out soooo cute!
Tara Weigner October 31, 2012 - 11:04
I love this idea, I’ve had it pinned since early this year and I just finally featured it on my blog as an item I want to make for the upcoming holiday. http://bandaidparade.blogspot.com/2012/10/what-are-you-making.html
Thanks for sharing!
Tara
stephanie collins December 24, 2012 - 19:24
Thanks for this. I just made my 6 year old one with a sash instead and kept it short sleeved. thanks a ton
marsha March 05, 2013 - 12:25
Thanks for sharing your talents! Just wondering if you have the formula for an adult top yet, or was that indietuts that was going to do that? I’ve used a storebought pattern for girls before but needed bigger sizes so it’s nice to learn the formula behind it all. I like to make mine several inches narrower in the chest with a tiered skirt but they’re all cute!
Peasant gowns | Biocarediag March 08, 2013 - 11:42
[…] Peasant Dress | Sew Like My MomSep 29, 2010 … To make the Peasant Dress you’ll need: -1 yard of fabric. I used two 1/2 yard cuts so that I could have contrast sleeves and trim -30″ of 3/8 inch … […]
Stacy Sews - Diary of a Fabric Junkie » Blog Archive » Linky Thursday March 14, 2013 - 05:52
[…] Get ready for spring with this sweet little girl’s peasant dress. […]
Jane March 29, 2013 - 11:07
I love this style and had been looking on how to make it..love it. My daughter is chubby but this looks really cute on her. Thank you!!!!
Kathy April 03, 2013 - 09:12
this is so cutie you made it easy first time sewing this dress pattern i was so easy thanks so much right on target on size too loved it
Terrie Brown April 14, 2013 - 17:37
You are the best – to share this great pattern and sewing instructions with us all. I am a grandma and am anxious to make MANY of these. Thank you so much.
A One Year Old Birthday Party | Chickadeemama July 23, 2013 - 19:50
[…] used these two blogs, Sew Like My Mom and Indietudes to help me make this peasant shirt /dress. Eric Carle Dots fabric bought at the Fat […]
Fiona January 29, 2014 - 08:02
Love these. Tweaked it a little for my daughter today. Will be making more. Didn’t add the elastic to the first one as was scared or getting it wrong on the gorgeous fabric I had used but am going to try on the next one. 🙂
Dawn September 15, 2014 - 11:09
Love this!! Searched all over looking for a pattern to make my first dress. So excited to see if I can make it for my little girl… Thanks for posting..
Laura October 13, 2014 - 12:17
I have a husky 4 year old. I would love to know how to adjust this pattern for a size 10/12.
Jacqueline @ Deeprootsathome.com November 01, 2014 - 12:03
Hi, Melissa,
I would like to ask your permission to use between one and 3 of your photos from this post. I think your pattern and instructions are wonderful and are very close to what Lillian Weber uses to make all her Little Dresses For Africa. I wrote this post ( http://www.deeprootsathome.com/why-99-year-old-lillian-weber-is-not-retired/ ) and would like to post again in the next few weeks on how to make her pattern (not the pillowcase dress). I would like to make one of your photos my top photo and add text, but I will link back to you with photo credit (stating that you gave permission) and also link back to your post so others can see how it is made. I have pretty high traffic, so you def will get traffic to your blog. Please let me know via email if it is OK with you. Thank you!
Jacqueline
Melissa November 04, 2014 - 01:28 – In reply to: Jacqueline @ Deeprootsathome.com
Absolutely, have at it! 🙂
Kari November 06, 2014 - 08:08
I’m new at this and sewing. So to be clear I will have 6 pieces of fabric all with the arm hole on the side right? Thanks
Kari
kari busby November 06, 2014 - 11:26
hey i’m new at this and new at sewing. Just making sure we have 6 pieces of fabric right (2 dresses, 2 sleeves, and 2 contrast)? Thanks.