
Shirt Bibs September 19, 2010 – Posted in: Uncategorized
Remember when I made the Shirt Skirts I said keep the rest of the shirt for 2 other projects? Well, this is one of them!
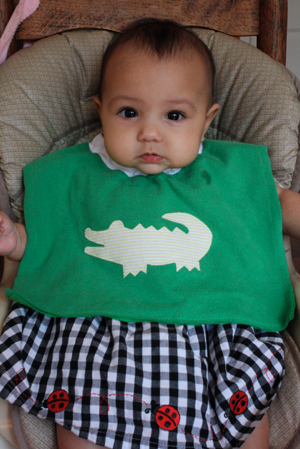
I knew Chloe would start solids soon and none of the bibs we have are big enough to properly cover her. Wanting to be as resourceful as possible, I decided to use the remaining neck part of the shirt to make huge baby-covering bibs!

I was excited to try my large, absorbent bib on my sweet new-to-food Chloe. I think it’s safe to say, it was a success!!


She sucks her thumb between bites, so her hands get plenty dirty. The bib was even long enough to cover her dress from her messy hands!

I liked the outcome so much I made more!
Some had an extra layer of flannel on the back for absorbability, some didn’t.

The elastic neck allows for further clothes-saving coverage.


Now they’re stacked up in the kitchen waiting for the next meal time!

And I was thrilled to discover they’re even big enough to be effective against toddler mess!

The process was easy! Each bib took me less than 30 minutes to make.
Lay out top part of the shirt flat.

Cut approximately 2″ from each side of the neck hole. I used no rulers, everything is eyeballed and estimated. Keep the sleeves!

Open the shirt and cut a few inches below the neck on the back. Or leave the full length if you’d like!

Lay on top of flannel (or fleece or cotton if you prefer) and cut around the edge of the bib.

Now you’ve got a front and a back the same size.

Flip them over so the flannel is on top.

Press down so you can see/feel the neck line of the shirt.

Using a pen, trace around the outer sewn edge of the neck opening.

Cut out the middle part. If you want to be extra resourceful, use this for the applique on the front.

I chose a different flannel print for my applique.

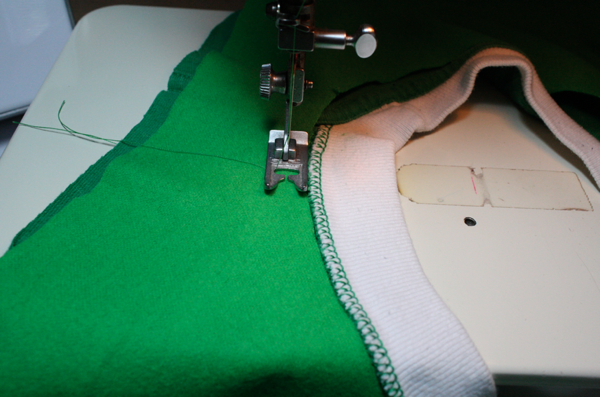
Sew the flannel to the shirt around the neck hole, using the existing edge for a guide.


Then stitch around the outer edge of the bib to secure the front and back to each other.

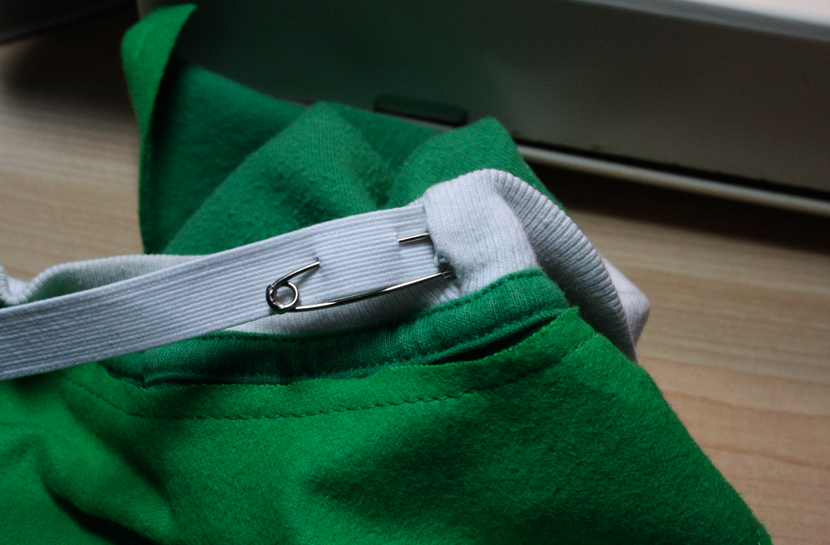
Then find the existing seam in the ribbed neck. Use your seam ripper to open it up.

Thread elastic through the neck using it as a casing. I used 12.5″ of .5″ elastic.

Stitch the ends of the elastic together and pull into the neck. If you’re particular, hand stitch the opening closed. I’m too lazy for that, though!

Then find a cute little model, and start feeding!

24 Comments
pam September 20, 2010 - 20:38
CLEVER!!!! My mom made some similar to this so they couldn’t be yanked off… but DUH – love the tshirt idea!!
My Magic Mom September 20, 2010 - 21:56
Those came out so cute. Chloe looks adorable in them too. Give the girls kisses for me!
Misty September 21, 2010 - 14:45
OMG those are too cute!!
Marcia September 22, 2010 - 17:55
What a precious model you found for your bibs!! Love ’em.
Allison September 22, 2010 - 22:39
I LOVE how these turned out! I’ve been working on a way to make these exact bibs! My favorite bibs are the ones that go over the head. they stay on and catch the most food! I tried cutting out the tee and then adding iron on vinyl to the front to make it easy to wipe clean, but it didn’t work because, duh, vinyl doesn’t stretch! Love the idea of backing it with flannel! Thanks for the easy tute! Now I can crank out a few dozen of these!
momochi April 22, 2011 - 19:17
Thanks for an idea, you sparked at thought from a angle I hadn’t given thoguht to yet. Now lets see if I can do something with it.
momochii May 21, 2011 - 20:17
Beneficial info and excellent design you got here! I want to thank you for sharing your ideas and putting the time into the stuff you publish! Great work!
The Shirt Skirt | Sew Like My Mom June 14, 2011 - 18:32
[…] I use the neck part to make the Shirt Bibs, and I use the sleeves to make shorts or bloomers. I haven’t posted a tutorial on this, but I […]
Clara June 14, 2011 - 23:14
Thank you so much for this cute idea! It looks like just what I need to make homemade bibs for my (adult) brother who is a stroke victim and drools a lot. I will attempt to use your pattern in a larger version…don’t think I will need to add elastic in the neckline, tho? The iron-on vinyl idea (from Allison) sounds like the answer to keeping him dry, also.
Sarah July 13, 2011 - 22:36
Love it! I featured this project on my blog and it was so easy and cute! I plan on making many more!
Thanks for the idea!
a new blogger from… http://gluegunsanddryerlint.blogspot.com/
krissy August 11, 2011 - 19:30
Wow love these! you are so creative! two questions for ya tho ….. Where do you get your applilique pictures (what do you trace, what kind of pattern) and second what kind of machine do you use to do your serging ? I don’t have a machine with that option and it always disapoints me when I work on something I love then I wash it and it freys or looks messy :/
Anyway thanks for sharing all of your great ideas 🙂
betsy February 21, 2012 - 09:58
I was wondering if you still had the tutorial on the vest onesie?
Isabella Ethan February 23, 2012 - 11:33
I’d like to greet you .
you are really wonderful women.
I like every thing you sew, I hope to make something as your doing.
I like visiting your page every day to see your news.
Joanna March 17, 2012 - 16:35
Hi! Great Idea! I have been cutting up my husbands old t-shirts to make hats out of the sleeves and trousers out of the body for our 16 month old. Now we need bigger bibs and this is a great idea to repurpose all those shirts! Thanks!
Joanna
Nancy March 19, 2012 - 16:18
Friggin adorable. And doesn’t look too complicated. Great idea, can’t wait to do it, thanks so much for sharing this! 🙂
Nikki Netherton March 31, 2012 - 21:30
Such a great idea! I am a babysitter and will definitely be making these! But how do you do the applique? Do you sew the design on by hand?
Alley May 22, 2012 - 22:15
Great idea!! I love recycling! I had a thought: If I were to make one of these bibs, I would put the flannel on the ‘right’ side of the t-shirt, sew around the perimeter, and then flip it! The raw edges would be in the middle. =)
Heather August 05, 2012 - 10:19
Thanks for the idea! I am not a crafty/sewy kind of person, but I tried it and it didn’t turn out too bad for a first timer!!!
Emma Ruth May 25, 2013 - 16:37
I just tried something similar to this, and looked online to see if anyone else had done the same thing. I love this!
What I did was similar, but I thought I’d share my differences.
I had jut a collar left over from a different t-shirt project, so I decided to put it to use. I also had a scrap piece of towel that I wasn’t using anymore. I cut a circle in the towel that was about the same size as the collar and (simple as that!) sewed them together. I made sure to fold over the raw cut edges of the towel and use a zig-zag stitch to keep the fray away. The towel is very absorbant and keeps the food off of clothes effectively!
Happy sewing!
Elizabeth C May 30, 2013 - 23:38
😀
Mandy January 27, 2014 - 09:18
Just added this to my list of baby essentials for minimalists – what a great way to upcycle an old shirt! Thanks for the clever idea! http://stayathomemoneymanager.com/2014/01/24/a-minimalists-list-of-baby-essentials/comment-page-1/#comment-281
A minimalist’s guide to baby essentials | Stay at Home Money Manager January 27, 2014 - 09:29
[…] Bibs – I agree with Deborah’s comment below and am adding this to the list. You can use towels instead of traditional bibs – or upcycle an old shirt or sweatshirt like this mom! […]
Baby I Got Scraps! | sewforkids June 23, 2014 - 13:19
[…] them more appealing. And of course you can upcycle items you have like denim jeans , T shirts as here , here and here […]
Angela Jackson October 17, 2014 - 08:34
Hi, I love the idea that you used a shirt as a bib and make it as long as possible in order to save the baby clothes from being stained.