twirly tshirt dress May 19, 2012 – Posted in: Tutorials
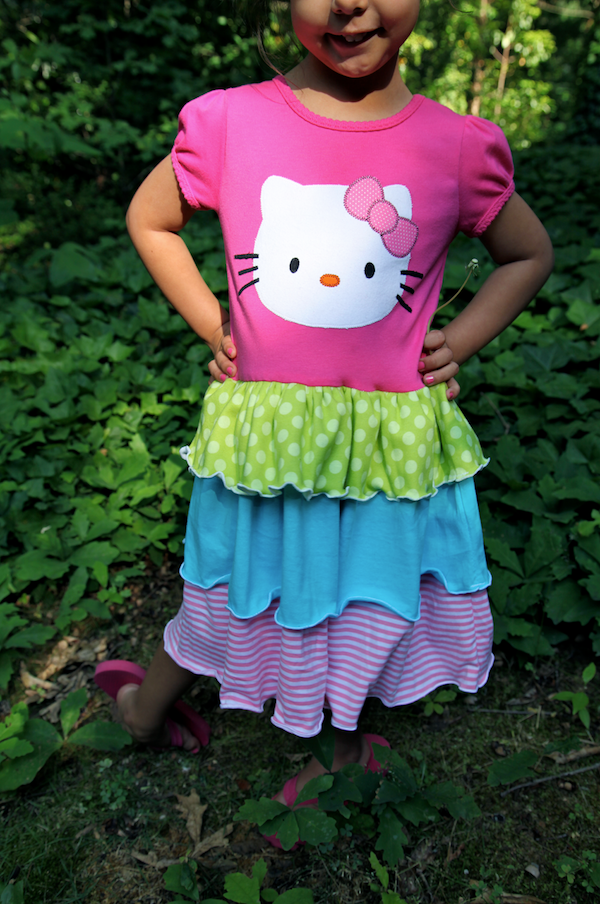
For the third year in a row, I’ve had the privilege of making the outfit my friends daughter wears for her birthday party. Every year she dreams up the most adorable outfits for her kiddo and asks me to make them come to life. I was a little leery of this dress at first because I’ve only experimented with tshirt dresses one time before. But I just went for it and I absolutely adore it! Good news is, so does the birthday girl!
The applique was the easy part. After that, I was flying by the seat of my pants. Is this the “right” way? Probably not, but it’s cute and functional and will be awesome, so I’m good with it!
I made it to “match” the decorations she picked up from Party City. I loved playing with the patterns in my knits and the contrast of bright, cheery colors. And the skirt just absolutely had to be twirly (it’s a must for all skirts and dresses in this house!).
When I say this was an easy project, I mean it! I started by appliqueing Hello Kitty onto a shirt. See my applique tutorials here and here for more info!
Then I decided on 3 knits I wanted to use for the skirt tiers.
I decided I wanted the skirt to be 13″ long, so I cut the longest layer 13.5″, the middle layer 4.5″ shorter, so 9″, and the shortest layer 4.5″. Using my serger I did a rolled hem along the bottom of each layer. This isn’t necessary, but I liked the way it looked.
I sewed the ends of each layer together to form circles. Placing them in the appropriate size order with all right sides up, I pinned the pieces together and ran a long running stitch along the top to gather. I actually ran 2, one on each side, so it was easier to work with.
I pulled up all my gathers. Since I used the full width of the fabric to make the layers, I had to gather as far as the fabric would let me. I recommend cutting some fabric off so it’s not too bulky and is easier to deal with. I got lucky!
Then I cut 4″ off the bottom of my shirt. I decided how much to cut by taking my skirt length, plus the length of the shirt and figuring out how much extra length I had. It was 4″ longer than I wanted, so 4″ came off!
Turning the shirt inside out, I pinned it to the skirt.
I used a long, narrow zigzag to sew the layers together. They stretch better that way and you’re less likely to break threads.
Turn it right side out and you’re done! Quick, simple, and very comfortable!


6 Comments
ela May 19, 2012 - 09:50
very cute dress! and little model so lovely 🙂
Wendy May 19, 2012 - 12:42
Perfect! My daughter is having a Hello Kitty party next month so this will be perfect for her. Thanks for sharing.
Allison June 09, 2012 - 14:13
That is so adorable! My stepdaughter loves hello kitty, I’ll definately be making her one of these. She’s going to be over the moon excited when she get this, thanks for sharing!
Penny July 17, 2013 - 02:04
Not sure if my note yesterday got thru.. so here goes again!
I’m a (very) beginner sewer and have read your different patterns many times. I love that they are so easy to understand and can’t wait to put them to the test. Regarding the shirt dress, I’m showing my lack of skill here when I ask how to gather?? Just pull on the thread? Any tuts on that one you can recommend? Ha ha ha – got to laugh at myself – wish my very capable mother lived closer!! Thanks!
Melissa July 17, 2013 - 16:37 – In reply to: Penny
Google tutorials on gathering and you’ll find tons!
Sarah Helene August 14, 2014 - 18:19
WOW . . . what a FUN, CUTE & “IN” girl’s DRESS! HELLO KITTY T-shirt top with a 3-layered-ruffled skirt in different colorful fabrics: lime green with polka dots, aqua, and pink & white stripes. Such a popular logo: kitty face. . . wherever she goes wearing this, I’m certain many will complement your friend’s girl’s UNIQUE dress! Thanks for sharing your Twirly T-Short Dress tutorial with detailed instructions and accompanying photos. Sarah in Minneapolis